Tuesday, February 16, 2016

Quartet Sequence - Uptown Funk


Here is a quartet sequence for "Uptown Funk" by Mark Ronson ft. Bruno Mars. This was originally done with xLights then brought into LOR. I have included the xLights files, and the graphics I used can be downloaded for free.

These is a starter sequence for a quartet. If you have other elements, you will need to sequence those parts yourself, but this will save you a lot of time for the main part, as I have done the vocals.

Yes, I am selling these files, as it took a significant amount of time to create and sequence. I am willing to share some of my content, but not when I have put as much work into it as I have, with the singing character parts.


Files in download:

LOR Sequence File
xLights XML File (Full, not just quartet)
Music Link Data


Screenshot from LOR Sequence File:


Download Sequence/Data
--- $15 ---

A link to download will be emailed within 24 hours.

MP3 Audio can be found here (AmazonMP3)

Clean Edited version by 
DJ Michael Dean

Channels used for the vocals:


Wednesday, February 3, 2016

Tuesday, January 12, 2016

Light Show Control Panel

My light show is ran from a Raspberry Pi, and I wanted to add the ability to start the show without using a WiFi enabled device. I picked up a few arcade buttons from Fry's Electronics, but you can easily find them on Amazon as well. I would have preferred to have a different color for each button, but Fry's only had the three colors. If you build one yourself, use different color buttons so you can tell a kid "Push the green button to start the show".

I didn't want to be tethered to the main controller box either, and because ethernet cables are already used everywhere else, I wanted to use the same type of cable so the control panel can be anywhere.


The box is made from Pine wood bought from the local hardware store. I used 1 1/2 wood screws for the main edges, and 1 1/4 wood screws for the wood pieces that holds the control panel itself. The panel is a recycled piece of 1/4 wood, with a thin piece of plexiglass on the top. DO NOT apply any pressure to the drill when making the holes on the plexiglass, other than the weight of the drill.

I had everything built, but only one button worked initially. After some research, I added the Pull Up Resisters (10k Ohm) to the RJ45 box so the Raspberry Pi could get a better reading on the switch position. The security key switch is used to interrupt the common ground to all of the switches, so I can disable the control panel if needed.


I used an old IDE cable to plug into the Raspberry Pi. The notch on the cable will face the CPU when plugged into the Raspberry Pi.

RJ45 box, so I can use Ethernet cabling between the controller box and the Control Panel.

Wiring for the buttons

Pull Up Resister diagram

RJ45 Box with the Pull Up Resister, and the Pin 1 with 3.3v going to the resister network I created.

Their are other ways of using the Pull Up Resisters, but I wanted minimal extra parts in the control box.  I had to grab pin 1 (3.3v) and connect that to a spider of resisters, each one connected to the GPIO wire. When the buttons are used, they will simply short the GPIO to Ground, which will drop the voltage on the GPIO pin.

The only disadvantage to this design, if the cable gets unplugged or plugged in, it can make the Raspberry Pi think you hit a button when you didn't. For this reason, I used the falling setting on the GPIO Input Settings, so I could start the show, and disable the panel without restarting the show.
Linking it all together. Get scripts from https://github.com/FalconChristmas/fpp-scripts
Download the scripts you want and upload them to the FPP. Then create "Events" to trigger the scripts.
Assign the events to the GPIO inputs

Sunday, December 27, 2015

Quartet Sequence - The Movie Melody by Straight No Chaser


Here is a quartet sequence for "The Movie Melody" by Straight No Chaser. This was originally done with xLights then brought into LOR. I have included the xLights files, and the graphics I used can be downloaded for free.

These is a starter sequence for a quartet. If you have other elements, you will need to sequence those parts yourself, but this will save you a lot of time for the main part, as I have done the vocals.

Yes, I am selling these files, as it took a significant amount of time to create and sequence. I am willing to share some of my content, but not when I have put as much work into it as I have, with the singing character parts.


Files in download:

LOR Sequence File
xLights XML File (Full, not just quartet)
Music Link Data


Screenshot from LOR Sequence File:


Download Sequence/Data
--- $15 ---

A link to download will be emailed within 24 hours.

MP3 Audio can be found here (AmazonMP3)

Graphics Used in Sequence


Channels used for the vocals:


Thursday, December 24, 2015

Quartet in xLights

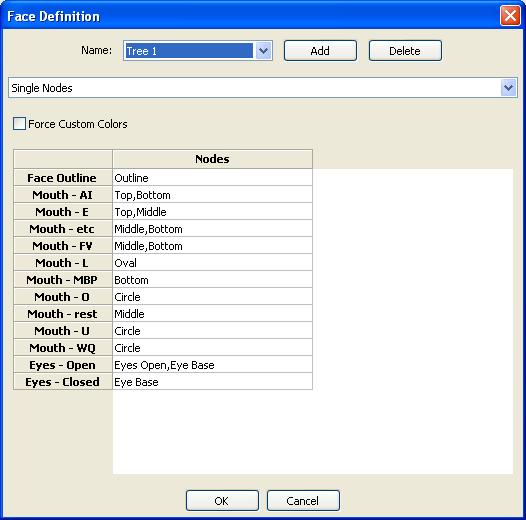
Create a new model in xLights, and set it for Custom, Single Color White, with a size of 19x21. Download the CSV file below. Open it in notepad, select all, copy, then paste the text into the top left of the xLights model you just created. It should look like the screenshot below. Once that is done, the Names and Faces buttons will need to be used to complete the setup of the character.
These are the names of each strand of lights on the singing character. These names will be used for the definitions of the character.

Here is the important link to the Papagayo within xLights. You have to tell the software what channels to turn on for the specific phenom. These are the ones I use. I feel that using the middle lip on the HolidayCoro Trees look more happy when resting, and makes the mouth movements flow better.


Download CSV File
text

Monday, November 23, 2015

Tree Quartet - Frosty/Here Comes Santa Clause


Here is a fun quartet sequence for "Frosty The Snowman" by Acapella Christmas. This was originally done with xLights then brought into LOR.

These is a starter sequence for a quartet. If you have other elements, you will need to sequence those parts yourself, but this will save you a lot of time for the main part, as I have done the vocals.

Yes, I am selling these files, as it took a significant amount of time to create and sequence. I am willing to share some of my content, but not when I have put as much work into it as I have, with the singing character parts.


Files in download:

LOR Sequence File
xLights XML File
Music Link Data

Screenshot from LOR Sequence File:


Download Sequence/Data
--- $8 ---

A link to download will be emailed within 24 hours.

MP3 Audio can be found here (AmazonMP3)

Channels used for the vocals:


Wednesday, November 11, 2015

Show Computer in a Box

Inside the control box:
Raspberry Pi 2
Sain Sonic FM Transmitter
D-Link 5 port ethernet switch
Dipole Antenna cut for 97.9 FM
WiFi Dongle on USB Extension cord
RF Chokes on low voltage cables


Antenna:
The antenna is a simple dipole antenna. Basically, its a section of coax to the transmitter with the and of the coax going to a specifically measured length of wire (standard speaker wire). The center of the coax is the main radiating element of the antenna, while the outside of the coax connection goes to a matched section acting as a base plane or counter poise wire. This allows the antenna to radiate its signal effectively with minimal SWR back to the transmitter. The antenna is hot glued into the lid of the box. The end of the coax is on the bottom right of the lid. The main radiating element wraps around the lid along the bottom, left side and along the top to be as far away from the other components as possible. The ground element wraps in the other direction along the right side of the lid, along the top and on part of the left side. The ground is not directly next to the radiating element, it is closer to the other components when the lid is closed. A Dipole calculator can be found here.

My antenna is tuned for around 97.9 MHz, so each side of the dipole is about 2ft. 4 - 11/16in

Raspberry Pi 2:
This is a kit from Amazon, and the FPP image put on the chip. A thumb drive is added to store all of the sequences/music/settings. This setup is using a small USB adaptor with a standard micro-usb cord for power. A spare USB extension cable was used to move the WiFi dongle away from the Pi and the other components, so it would get a better WiFi signal.

Transmitter:
SainSonic 0.5w transmitter, with a modified antenna connector. The connector was replaced with a standard BNC connection, as apposed to the RP-TNC connector with reversed gender.

Ethernet Switch:
A D-Link ethernet switch was used for this install, but any basic ethernet switch (not hub) will do.

General Constriction:
Everything is inside a CG-1500 case. Coro board was used on both sides of the case, and components were hot glued to the coro board. RF Chokes were added to the power for the transmitter, as well as part of the antenna to keep the RF on the top of the antenna. A standard extension cord with a 3 port breakout was used to supply power to the box.